steinel-nightmatiq-esp32-c3-gateway
Steinel NightmatIQ Plus Gateway for ESP32-C3
Standalone ESP32-C3 Bluetooth Mesh gateway for local Steinel NightmatIQ Plus control, diagnostics, firmware updates, and Home Assistant integration.
Steinel NightmatIQ Plus <-> Bluetooth Mesh <-> ESP32-C3 gateway -> Home Assistant
Community ESPHome firmware that turns an ESP32-C3 Super Mini into a dedicated local Steinel NightmatIQ Plus gateway. It imports the existing Steinel network configuration, communicates directly over Bluetooth Mesh, provides a password-protected browser interface, and exposes control, sensor, identity, and diagnostic entities to Home Assistant.
Author and maintainer: Bartosz Supcziński — bartek@env.pl
Why this project exists
NightmatIQ Plus communicates through Bluetooth Mesh, while Home Assistant uses an IP network. The ESP32-C3 bridges these two environments: it joins the existing Mesh installation, exchanges commands and status messages directly with the sensor, and publishes them through ESPHome. Steinel Cloud is used during setup to import the network configuration; routine operation is local.
Screenshots
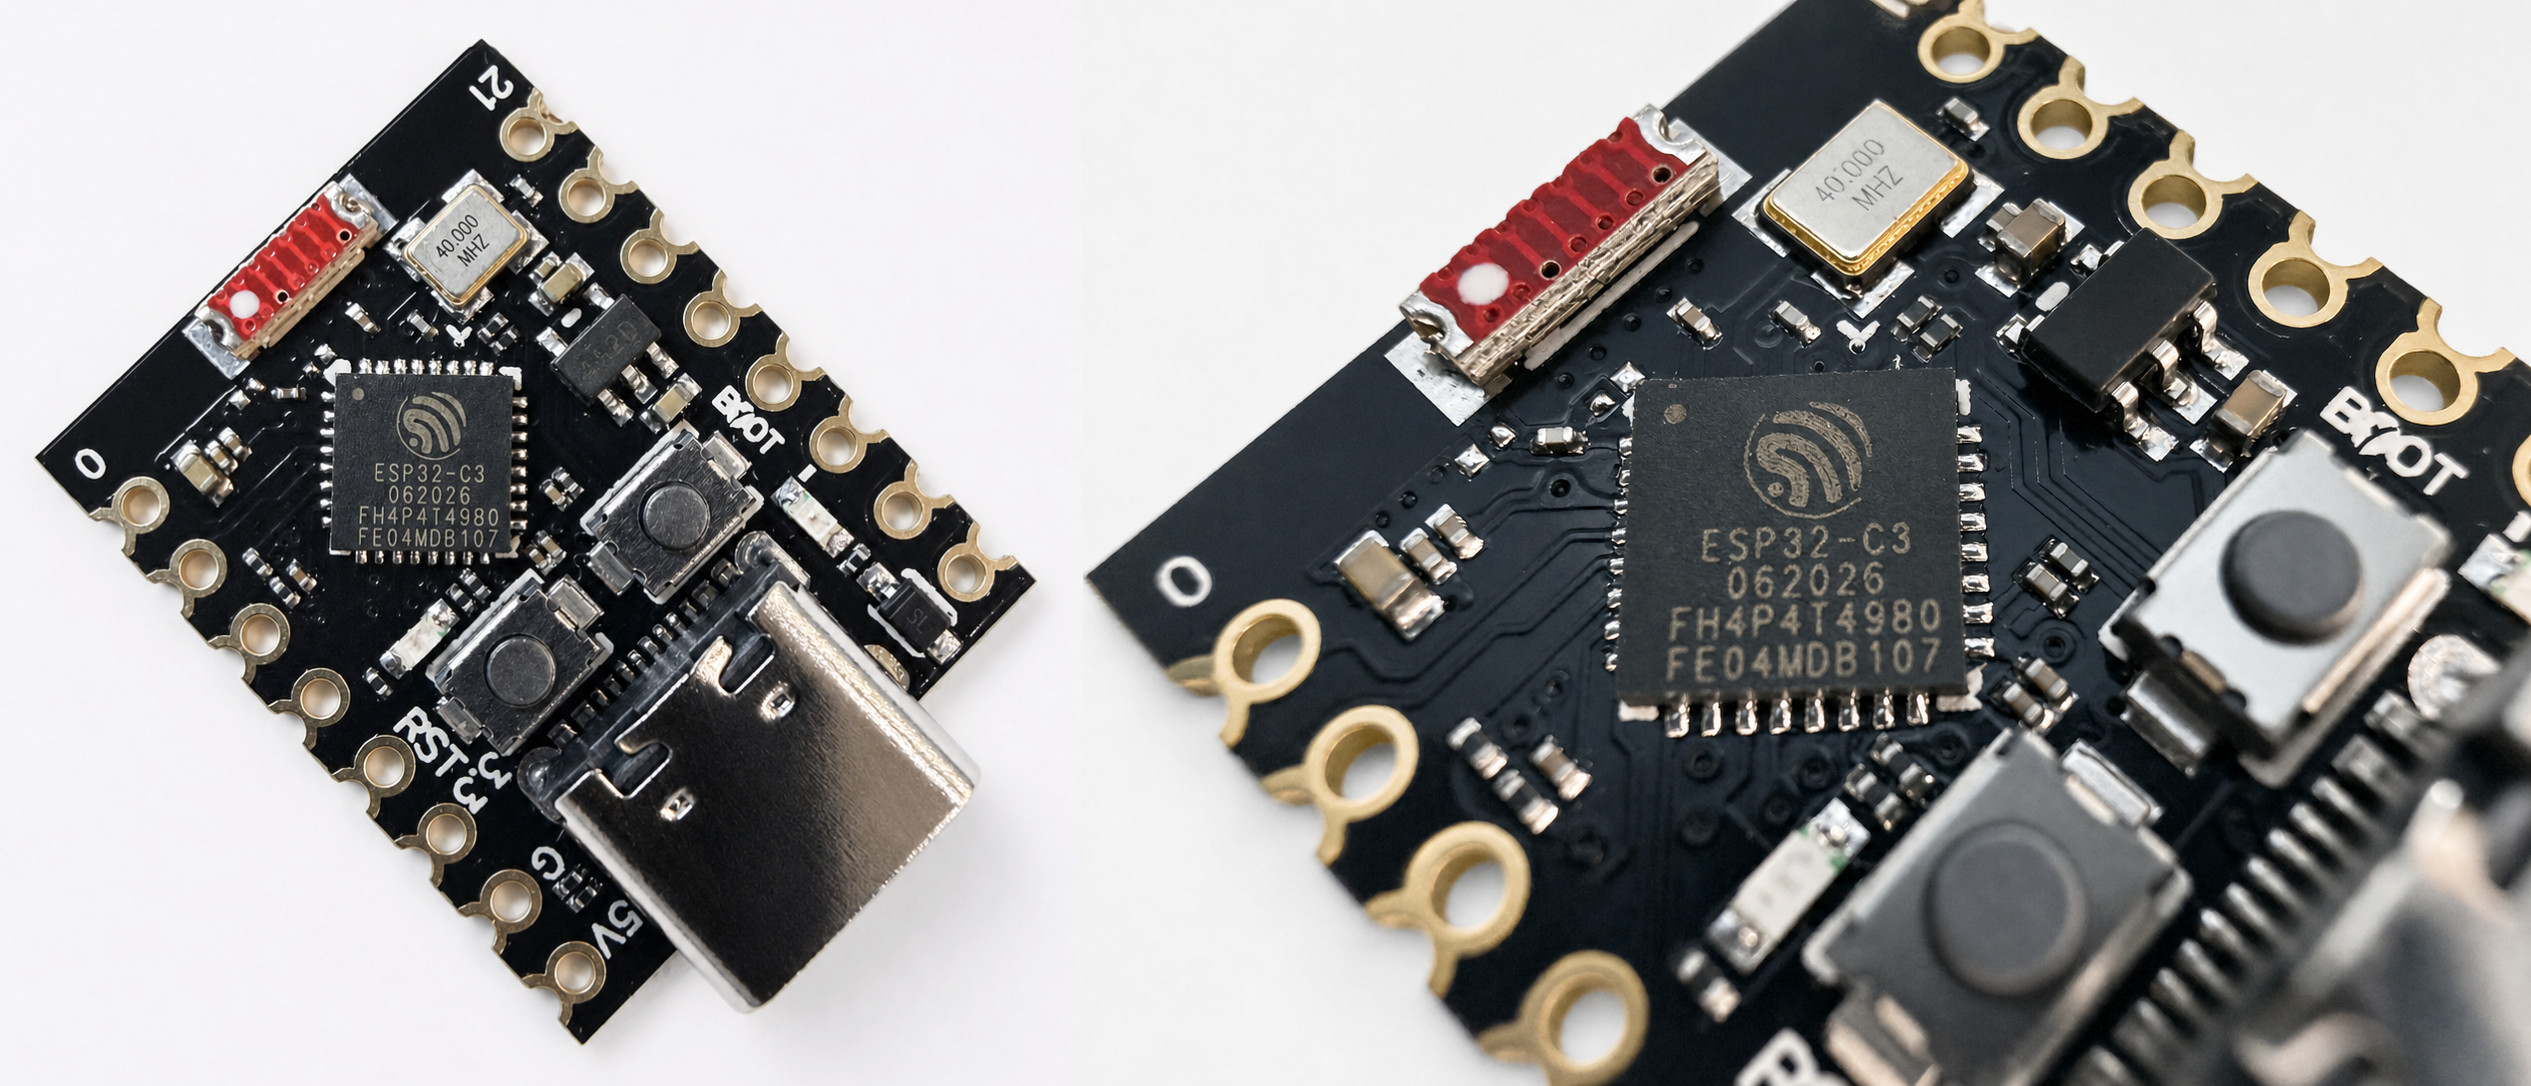
ESP32-C3 Super Mini
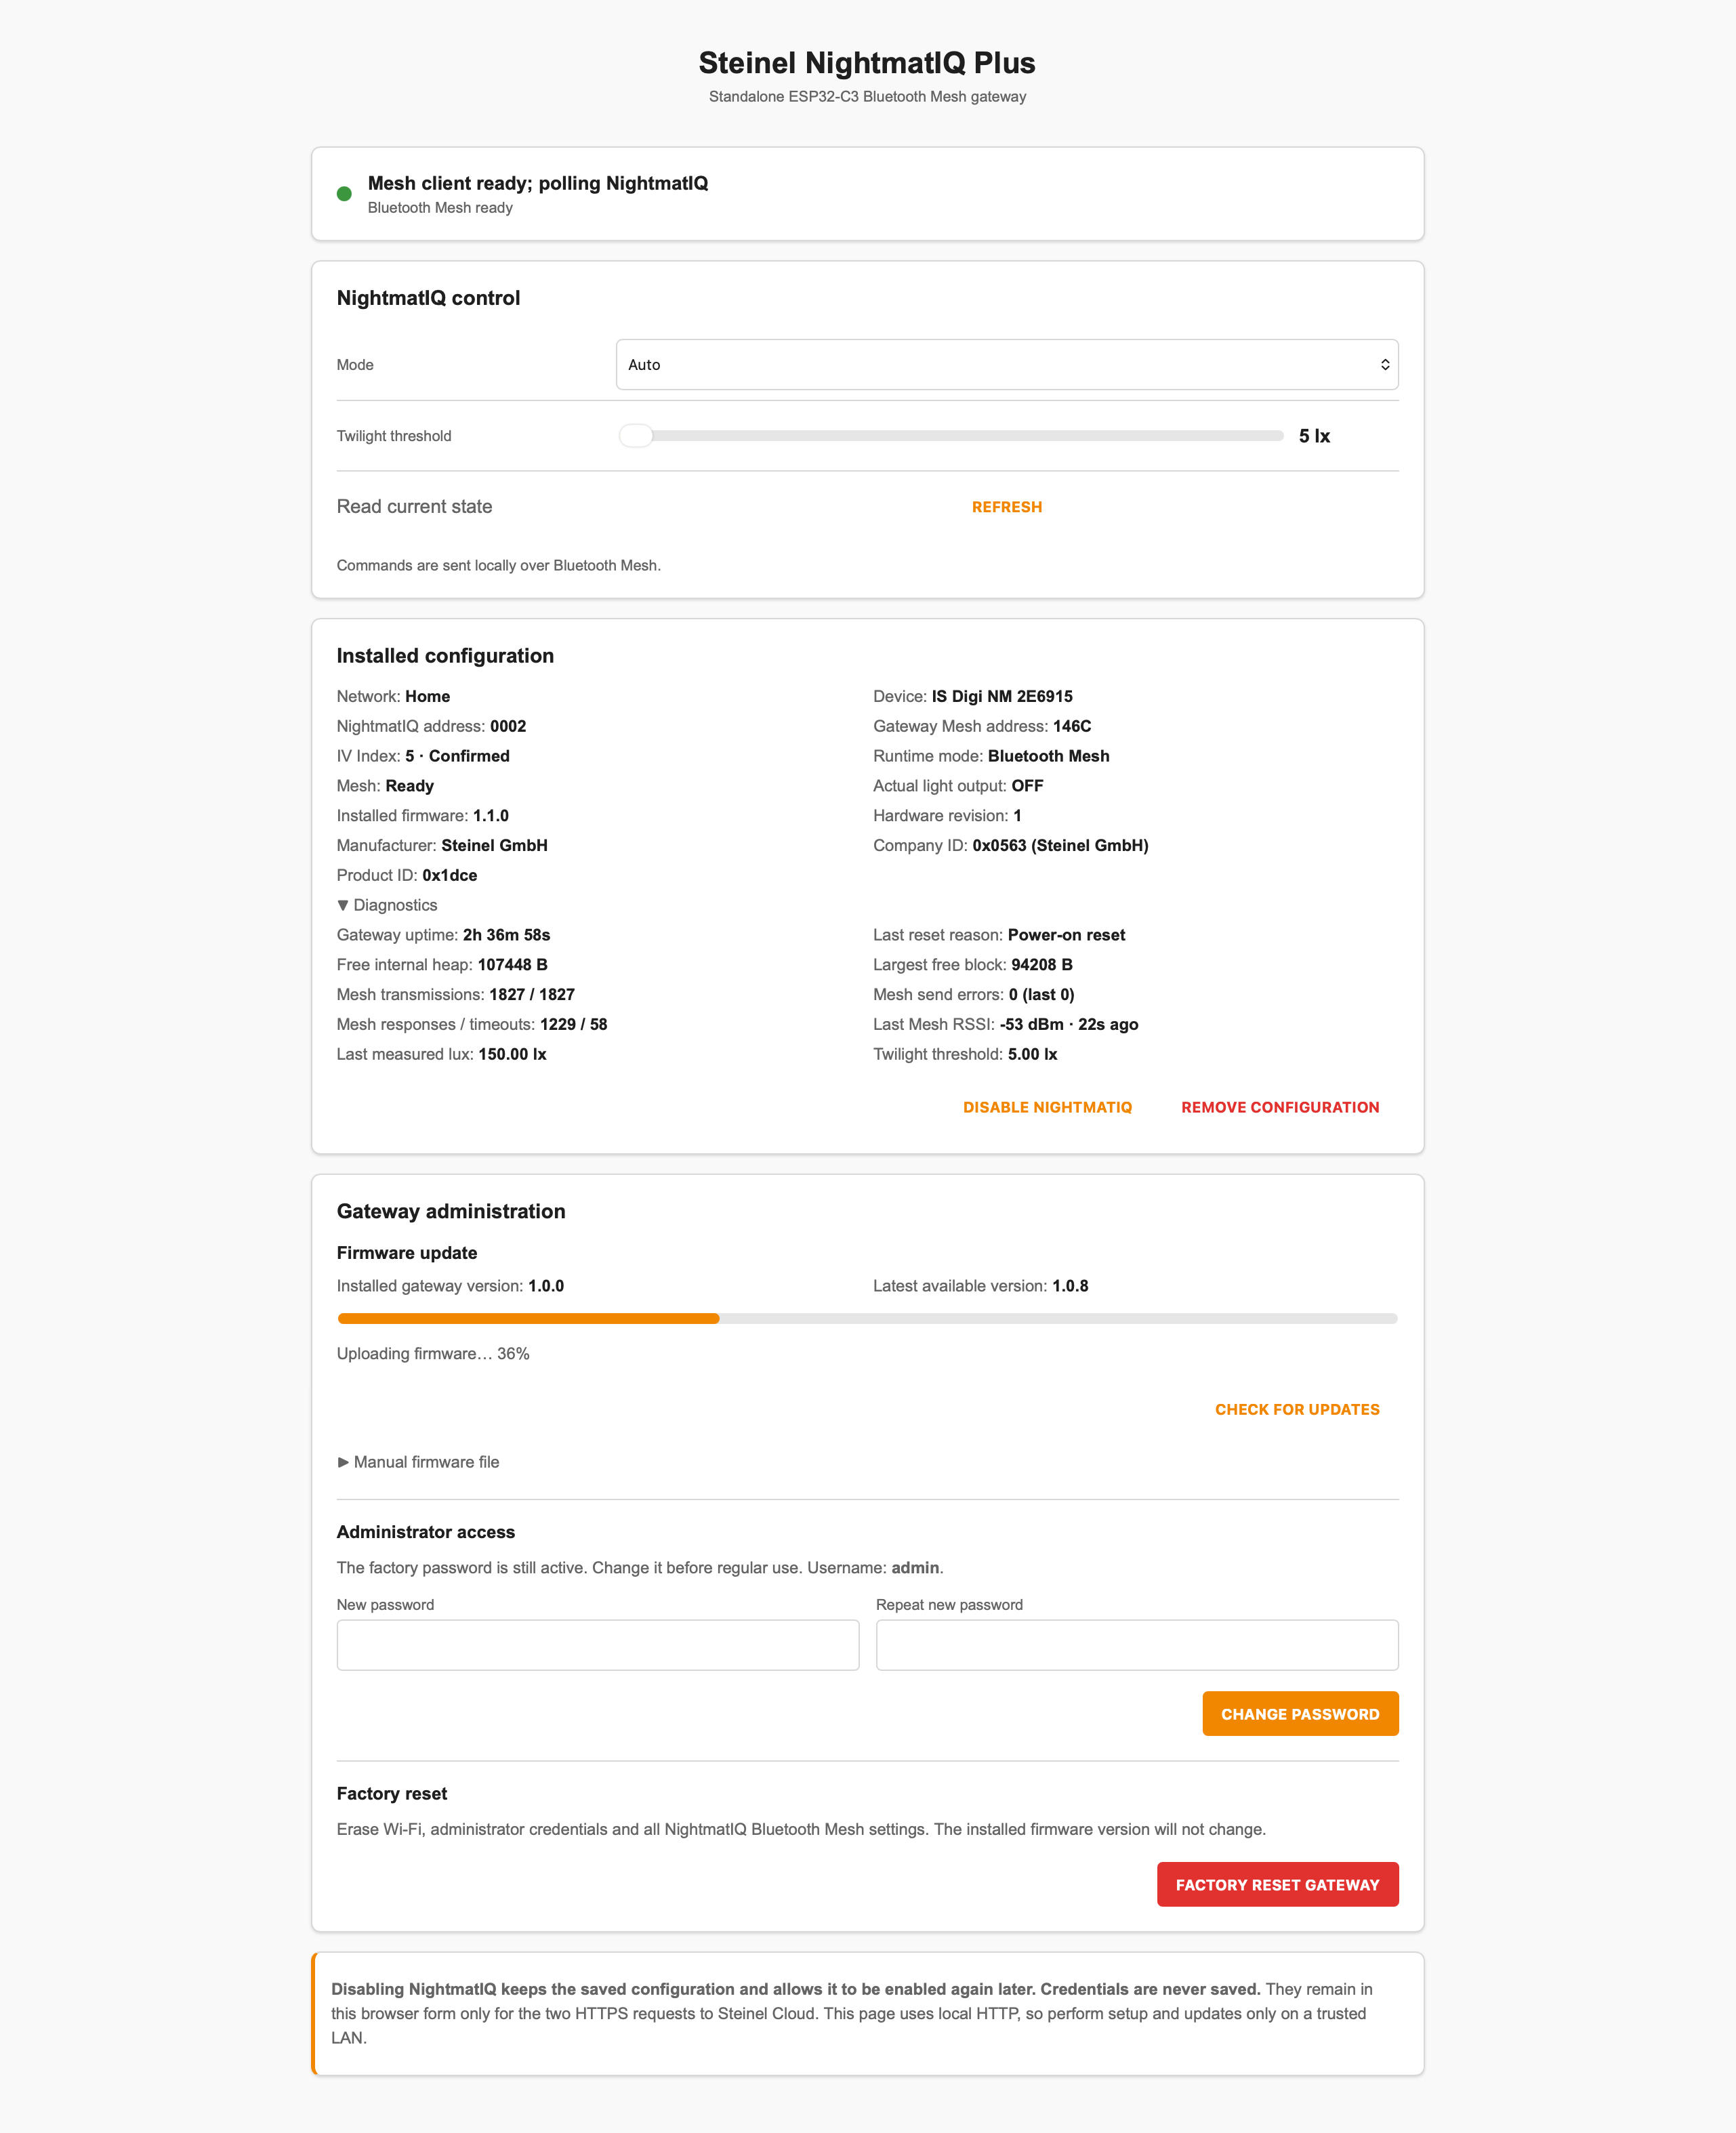
Local web interface
The built-in page provides setup, control, diagnostics and browser-based firmware updates.
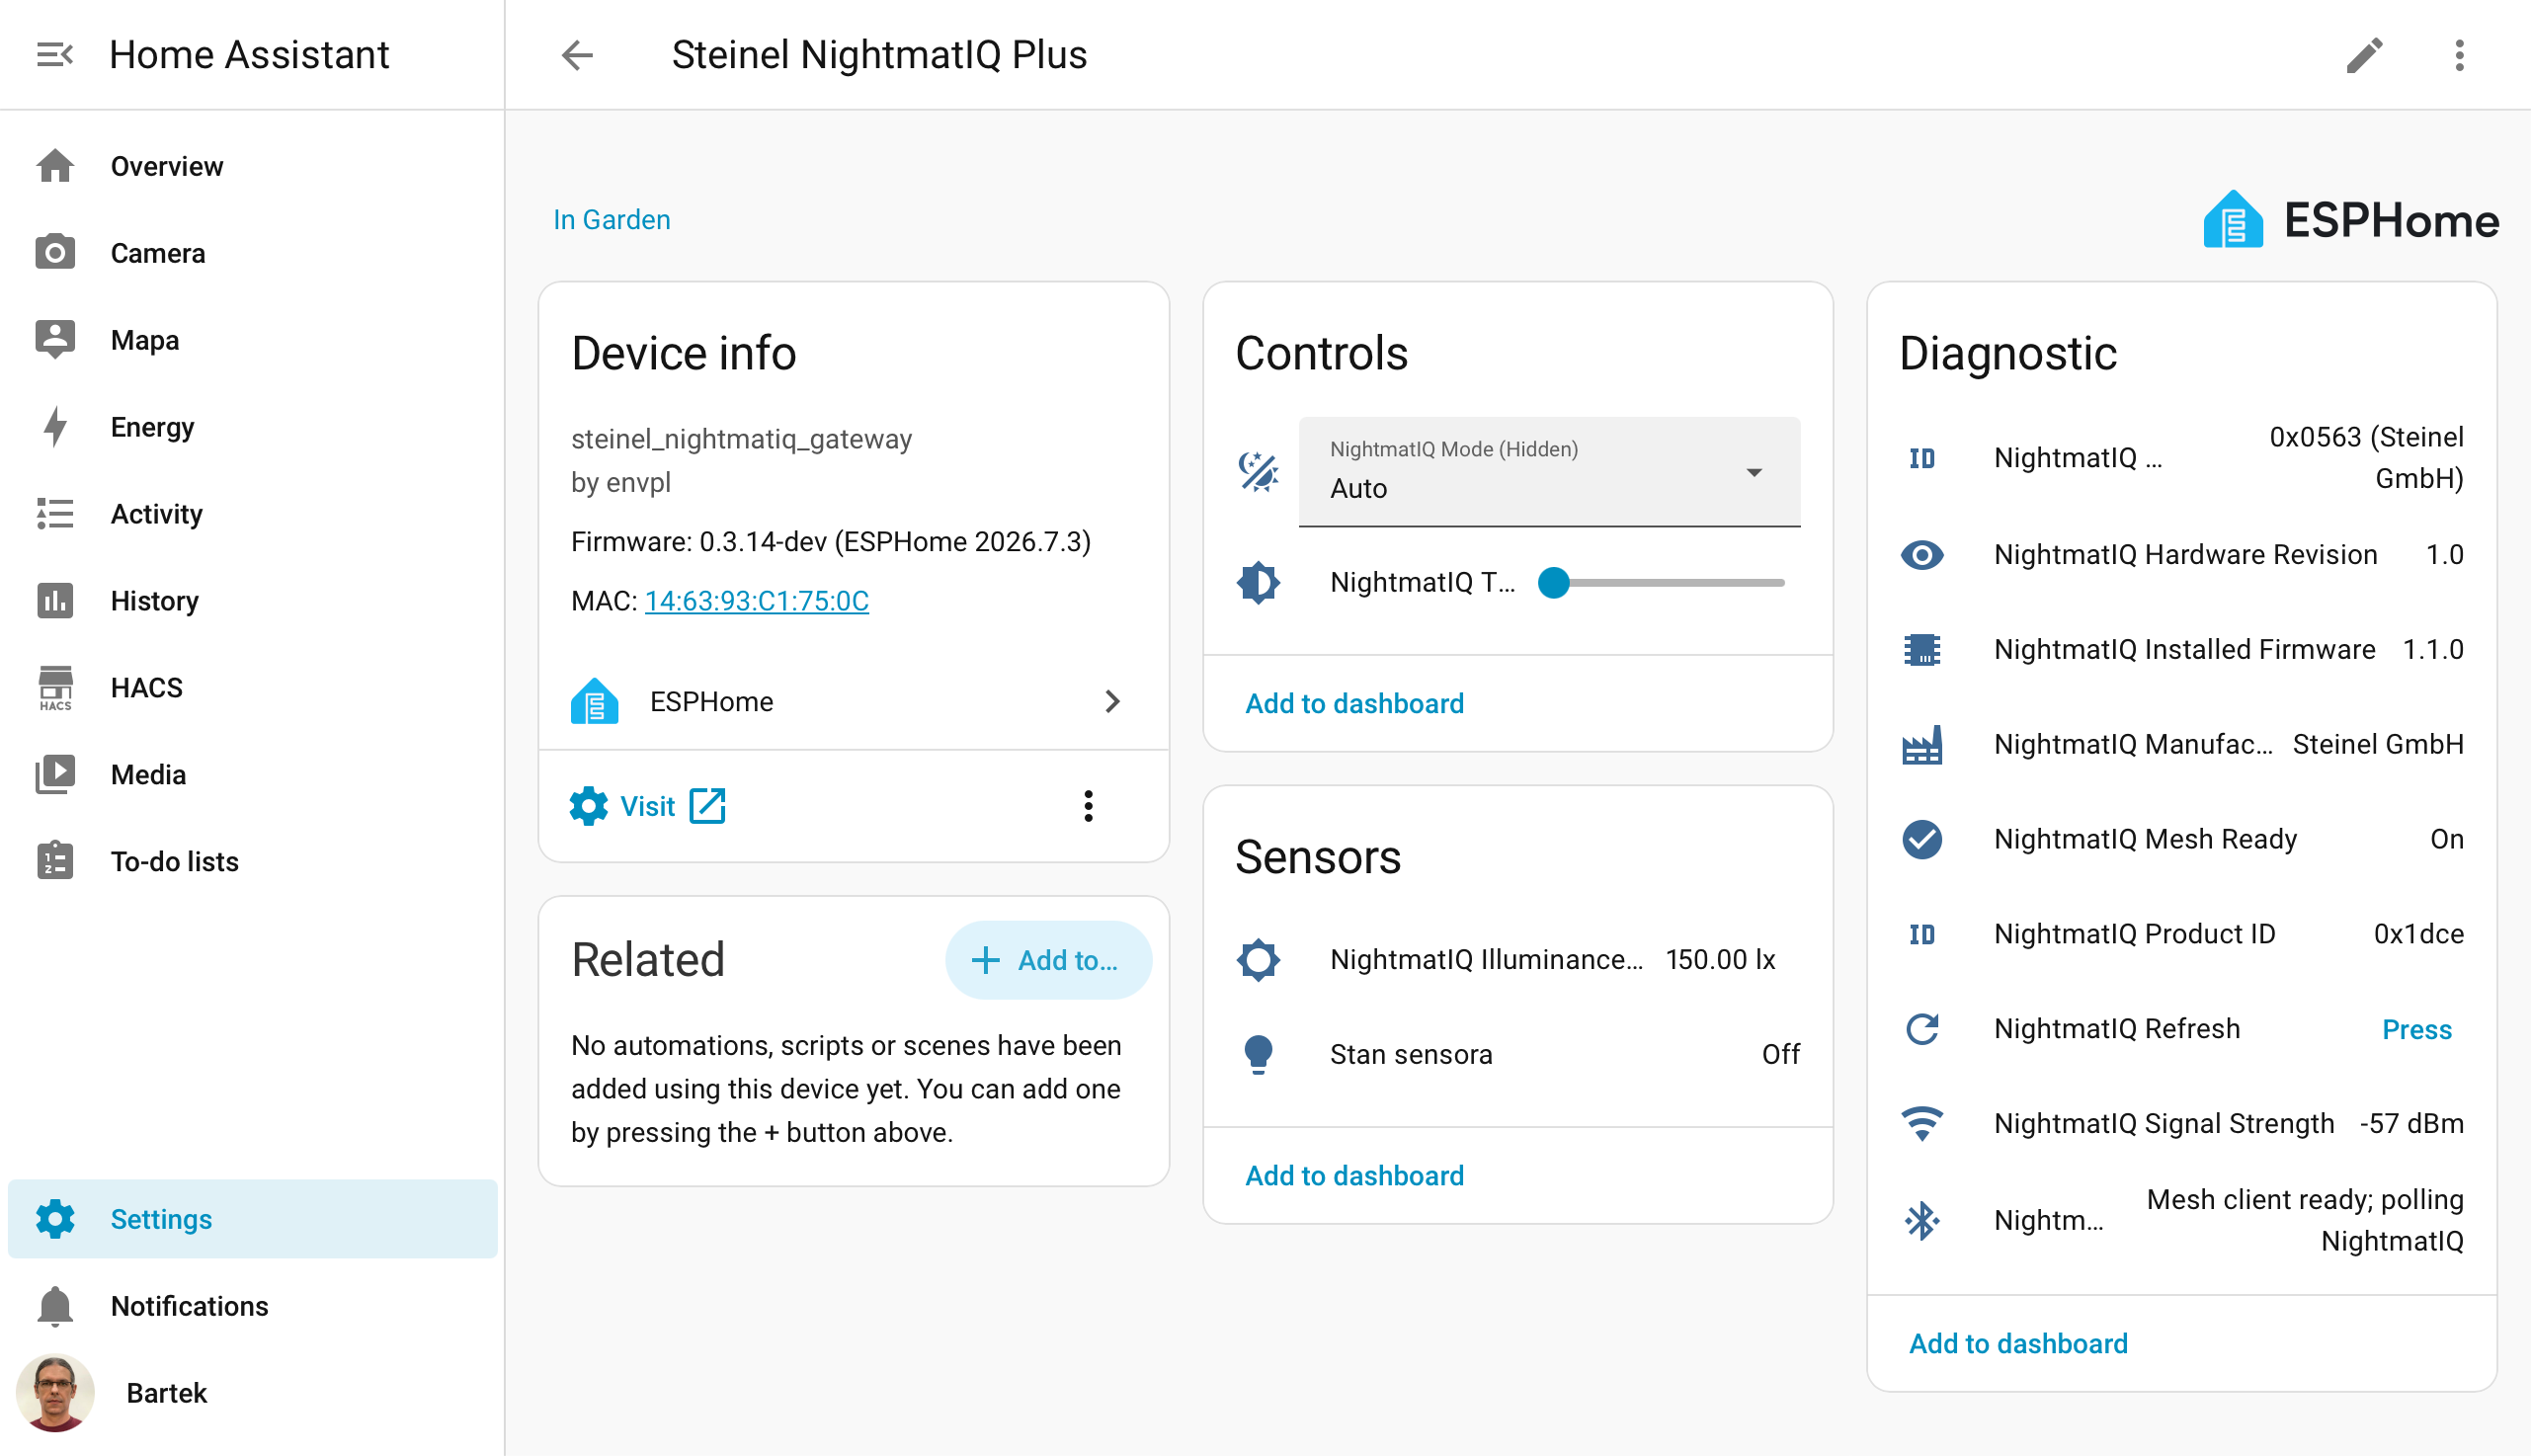
Home Assistant device
The standard ESPHome integration exposes NightmatIQ directly as a single Home Assistant device.
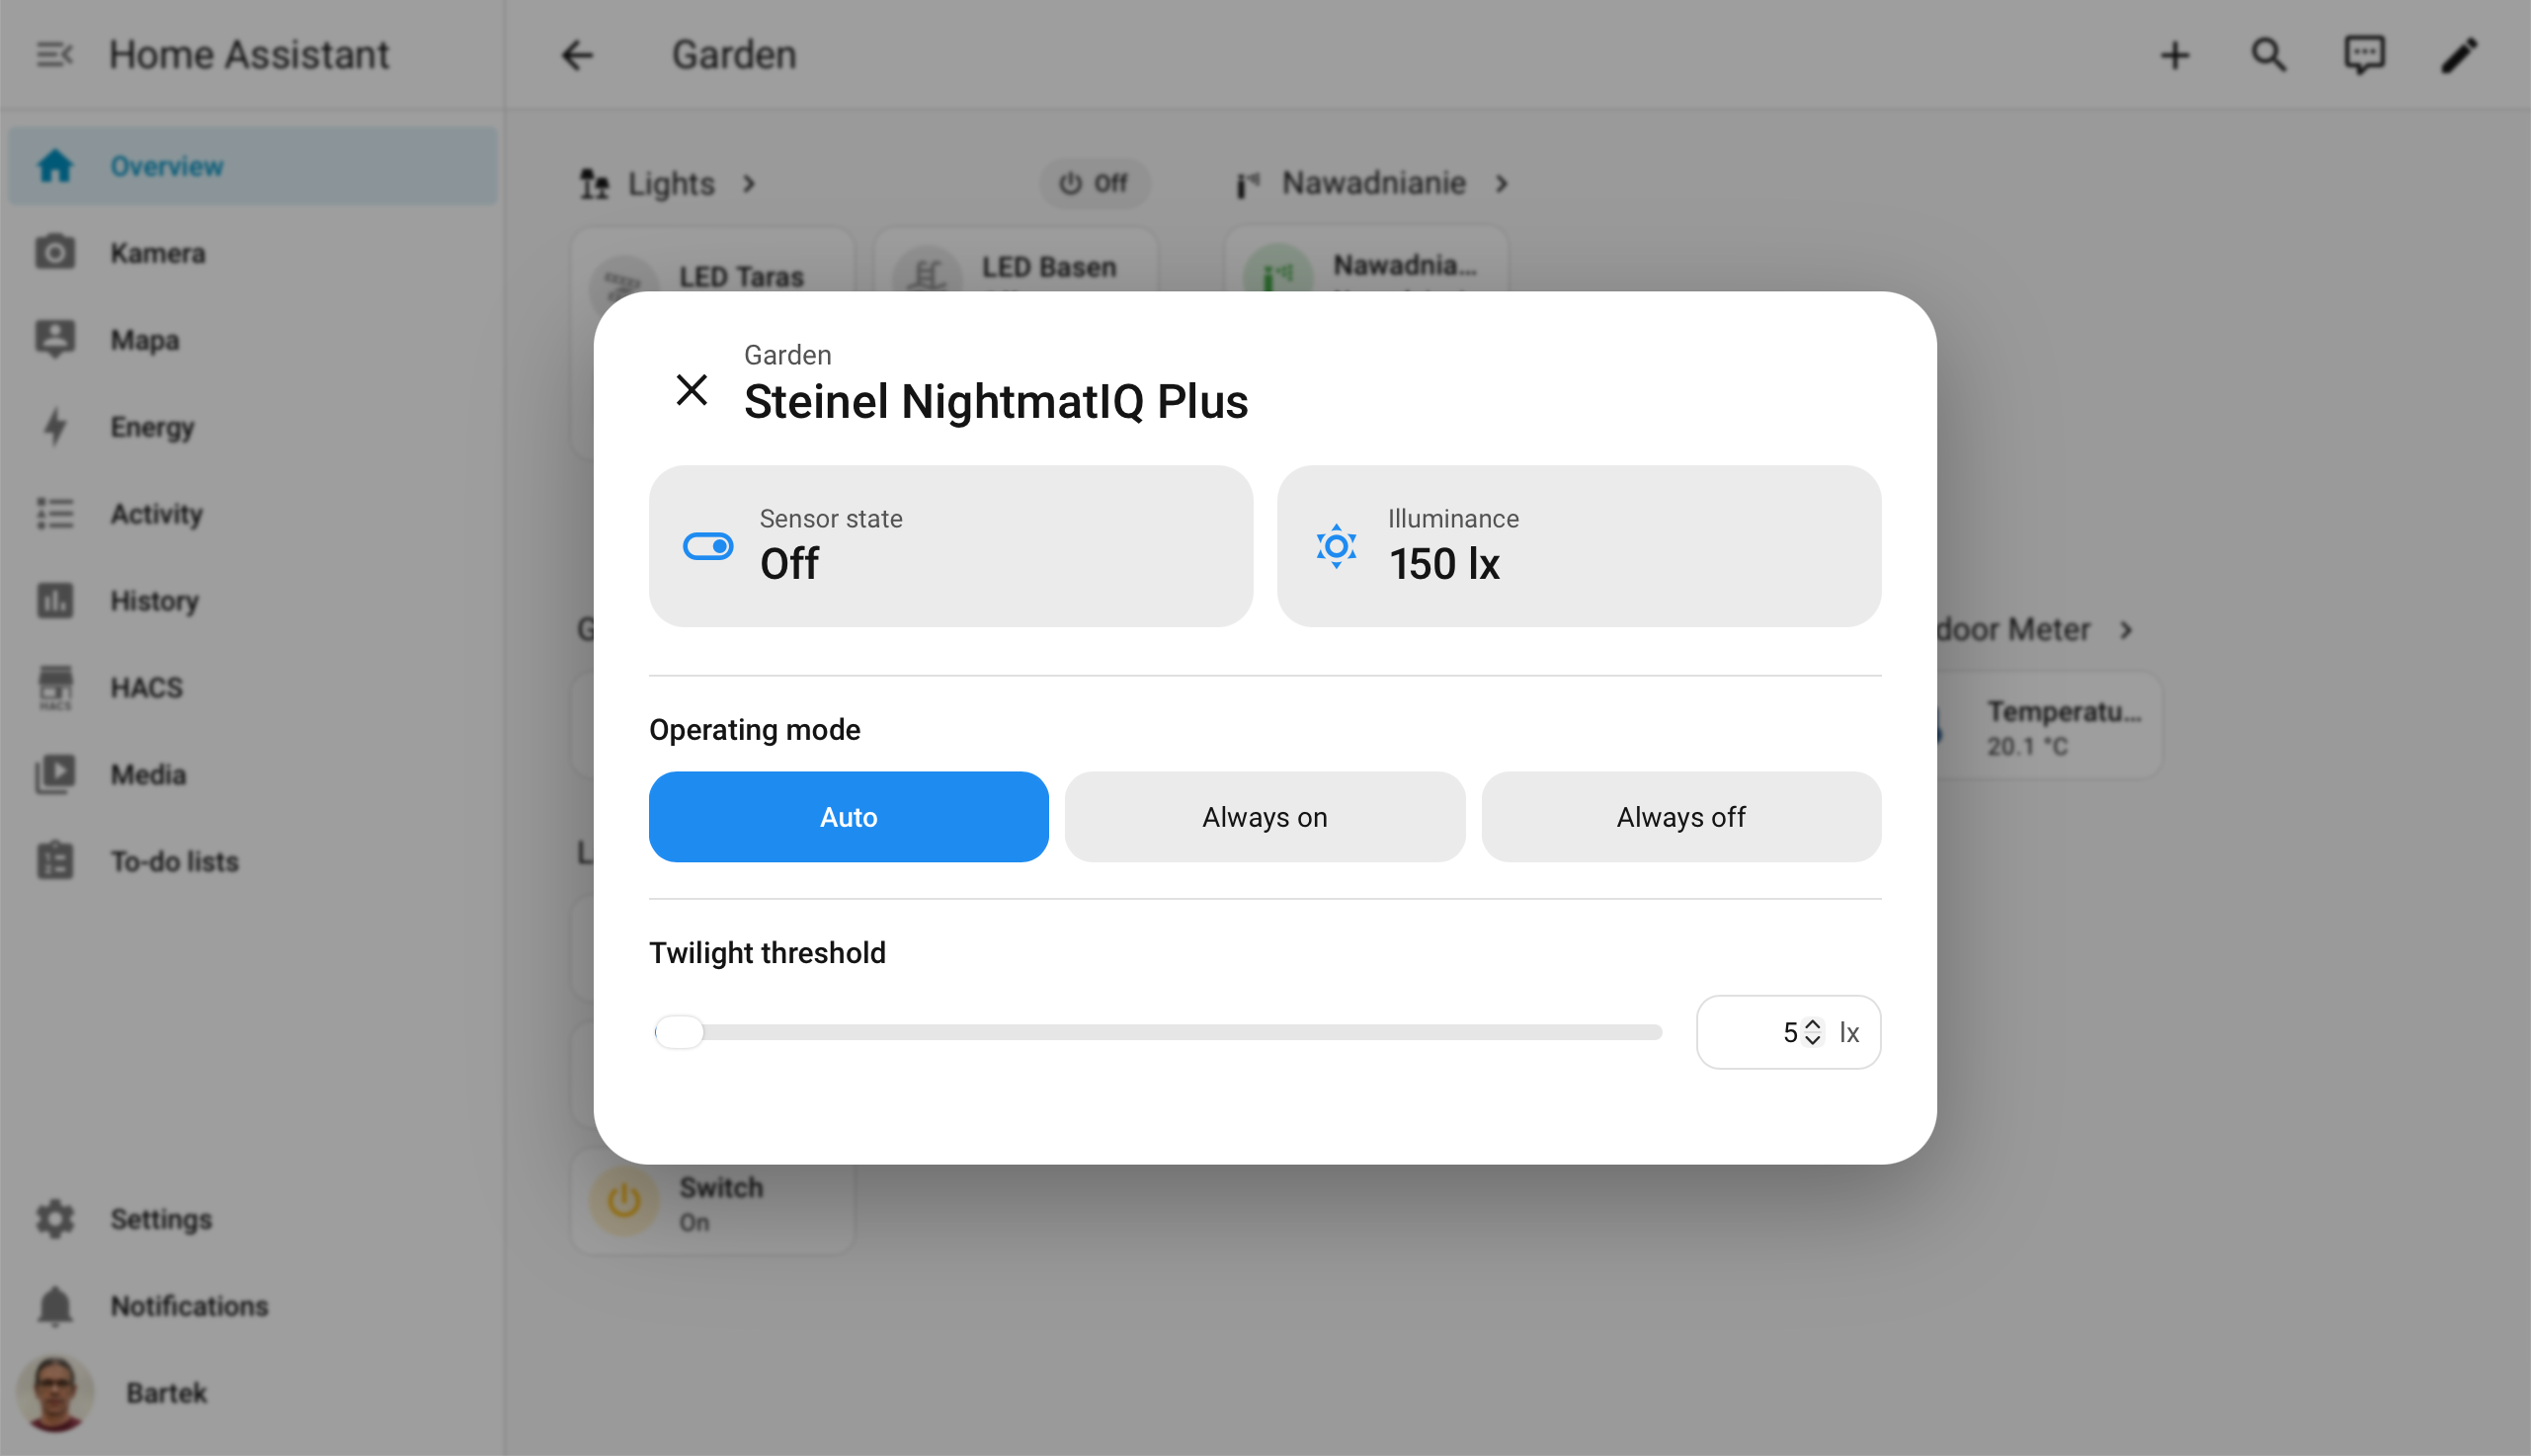
Optional Home Assistant control dialog
An optional frontend module combines sensor state, illuminance, operating mode and twilight threshold in one compact dialog.
What this project provides
Local Bluetooth Mesh integration
- Imports a Steinel network backup using the account supplied in the browser.
- Restores the network key, application key, IV Index and NightmatIQ node information.
- Communicates directly with the NightmatIQ over Bluetooth Mesh.
- Reads actual output state, illuminance, twilight threshold, firmware version, hardware revision and product identity.
- Controls
Auto,Always OnandAlways Offoperating modes. - Changes the twilight threshold from
1to1500 lx.
Reliable address and session handling
- Selects a gateway Mesh address from the unoccupied part of the provisioner range.
- Recovers automatically when Mesh peers reject a reused source address.
- Persists the first confirmed source address, preventing unnecessary changes after later restarts or temporary sensor outages.
- Preserves Mesh settings across normal reboots and OTA updates.
- Uses bounded retries and controlled restarts around cloud and Bluetooth transitions.
Device web interface
- NightmatIQ setup from Steinel Cloud.
- Live control and state refresh.
- Installed configuration and extended diagnostics.
- Mesh RSSI and response counters.
- Password-protected browser OTA update.
- Gateway administration panel with firmware updates, administrator password management and a complete factory reset.
Home Assistant integration
The standard ESPHome API publishes:
- actual sensor output state;
- measured illuminance;
- operating mode;
- twilight threshold;
- Bluetooth Mesh readiness and status;
- signal strength;
- installed firmware and hardware revision;
- manufacturer, Company ID and Product ID;
- a manual refresh action.
Home Assistant displays all published entities under one device named Steinel NightmatIQ Plus.
Hardware and compatibility
Required hardware
- ESP32-C3 Super Mini with 4 MB flash;
- native USB/JTAG serial connection for the first installation or recovery;
- 2.4 GHz Wi-Fi network;
- Steinel NightmatIQ Plus installation present in the Steinel account.
The USB interface normally appears as an Espressif USB JTAG/serial device (303a:1001) and as /dev/ttyACM* on Linux.
Supported target
The firmware is designed for the ESP32-C3 and ESP-IDF. Bluetooth 5 extended features are disabled because Bluetooth Mesh uses the BLE 4.2 advertising path. The configuration is intentionally sized for the limited RAM of the ESP32-C3.
Security
- The factory administrator account is
adminwith password12345678; change it on the device page immediately after joining Wi-Fi. - The administrator password protects both the local page and firmware updates and is stored in ESP32 NVS.
- The provisioning access point uses the factory password
12345678. - Steinel credentials entered on the setup page are used for the required HTTPS requests and are never saved by the gateway.
- The local web interface uses HTTP Digest authentication. It authenticates access but does not encrypt local HTTP traffic.
- The default ESPHome native API configuration does not use an encryption key.
- Perform setup and firmware updates only on a trusted LAN or an isolated IoT network.
- Do not commit a real
secrets.yaml, private keys, packet captures or Steinel backups.
Repository layout
| Path | Purpose |
|---|---|
esphome/nightmatiq-c3.yaml |
Main ESPHome firmware configuration |
esphome/components/nightmatiq_mesh/ |
Bluetooth Mesh, Steinel Cloud and local web component |
scripts/ |
Installation, validation, USB and OTA helpers |
home-assistant/ |
Optional Home Assistant package and compact control dialog |
docs/images/ |
Public README images |
Ready-made installation
The recommended first installation does not require compiling ESPHome:
- Download the latest
steinel-nightmatiq-esp32-c3-gateway-vX.Y.Z-factory.binfrom GitHub Releases. - Open ESPHome Web in a WebSerial-capable browser and connect the ESP32-C3 by USB.
- Select the board, choose Install, and select the downloaded
-factory.binfile. - After installation, continue with Connect Wi-Fi and Connect NightmatIQ below.
The file is processed locally by ESPHome Web. The -factory.bin image is for a new board or USB recovery; later browser updates use the -ota.bin image.
Building from source
Requirements
- Linux or macOS host;
- Python 3 and a supported ESPHome environment;
- USB access for the first installation;
- network access to the ESP32-C3 and Steinel Cloud during initial setup;
- Home Assistant is optional.
The supplied installer creates an isolated, reproducible environment using unmodified ESPHome 2026.7.3. No patch is applied to the installed ESPHome package.
1. Download and prepare the project
Clone or download this repository, enter its directory and install the pinned toolchain:
sudo bash scripts/01_install_esphome.sh
2. Validate
bash scripts/03_validate_all.sh
This runs repository checks and validates the ESPHome configuration.
3. First installation or USB recovery
Connect the ESP32-C3 and use its stable /dev/serial/by-id/ path when available:
sudo bash scripts/09_upload_usb.sh /dev/serial/by-id/usb-Espressif_USB_JTAG_serial_debug_unit_*-if00
If the board has no by-id link, use the detected ACM port:
sudo bash scripts/09_upload_usb.sh /dev/ttyACM0
The same compiled image can be installed on every supported ESP32-C3 board. The first USB installation also prepares the device for subsequent browser updates, so the boot button is normally not required again.
4. Connect Wi-Fi
- Connect to the access point named
nightmatiq-gateway-XXXXXXusing password12345678. - Select the target 2.4 GHz Wi-Fi network in the captive portal and enter its password.
- Wait for the gateway to restart and connect to the selected network.
- Open the address assigned by the router or the device hostname ending in
.local.
The Wi-Fi configuration is stored by the device and survives firmware updates.
5. Connect NightmatIQ
- Open the gateway address in a browser.
- Sign in as
adminwith factory password12345678. - In Gateway administration, change the password in the visible Administrator access section. The same new password will authorize future firmware updates.
- Sign in again after the automatic restart.
- Enter the Steinel Cloud account credentials and download the network list.
- Select the network containing the NightmatIQ device.
- Install the configuration and allow the gateway to restart.
The NightmatIQ node address and IV Index can normally be selected automatically from the backup. Credentials remain only in the browser form for the setup requests.
6. Updating over Wi-Fi
The gateway checks the latest stable GitHub release when its page opens; CHECK FOR UPDATES repeats the check manually. If a newer version is available, DOWNLOAD AND INSTALL downloads it over HTTPS, verifies its size and SHA-256 digest, installs it and restarts the gateway. A failed update leaves the current firmware active.
Manual installation remains available under Manual firmware file. Use only the release file ending in -ota.bin; -factory.bin is intended exclusively for the first USB installation. No separate OTA password is used or shown to the user.
Factory reset removes Wi-Fi, administrator and NightmatIQ Mesh settings, then restores the factory account and configuration access point without changing the installed firmware version.
From the command line, enter the administrator password when requested:
bash scripts/05_upload_ota.sh DEVICE_IP_OR_HOSTNAME
7. Home Assistant integration
Home Assistant usually discovers the device automatically through ESPHome. If it does not:
- Open Settings → Devices & services.
- Add the ESPHome integration.
- Enter the gateway IP address or hostname.
- Assign Steinel NightmatIQ Plus to the required area.
All control and diagnostic entities are attached directly to that device.
8. Optional compact Home Assistant dialog
The standard ESPHome integration provides all entities and controls. The files in home-assistant/ add the compact area tile and control dialog shown above.
- Copy
steinel-nightmatiq-package.yamlto the Home Assistant packages directory. - Copy
steinel-nightmatiq-popup.jsto/config/www/. - Add
/local/steinel-nightmatiq-popup.js?v=100as a JavaScript module in dashboard resources. - Reload the package configuration and refresh the browser cache.
The files use the default entity IDs created by a first installation. If Home Assistant appended _2 or another suffix, update the four IDs at the top of the JavaScript file and the corresponding IDs in the package YAML.
The module customizes the generated area tile and Home Assistant’s more-info dialog. Because that area strategy is part of the Home Assistant frontend, a future frontend release may require an update to the optional module.
Multiple gateways
During network import, each gateway derives a Mesh address policy from the selected installation and its own hardware identity. The same firmware can therefore be configured for different ESP32-C3 boards and NightmatIQ installations.
The MAC suffix in the device name is enabled by default, so multiple gateways receive unique hostnames and access-point names. Configure a unique administrator password on each gateway.
Fallback access point
If the configured Wi-Fi network is unavailable for 60 seconds, the gateway starts its password-protected access point again. Connect using factory access-point password 12345678 and update the Wi-Fi configuration through the captive portal. The local page remains protected by the administrator password selected on the device.
Troubleshooting
The gateway does not appear in Home Assistant
- Check that Home Assistant can reach the gateway on the IoT network.
- Add the ESPHome integration manually by IP address if discovery is filtered between VLANs.
- Confirm that the gateway is online and restart the ESPHome integration if the connection remains unavailable.
Mesh is ready but values remain unavailable
- Move the ESP32-C3 closer to the NightmatIQ and check Last Mesh RSSI in diagnostics.
- Wait for IV Index synchronization after importing a network backup.
- Use Refresh to request the current state.
Steinel network download fails
- Confirm that the account can access the installation in the official Steinel application.
- Check internet access, DNS and system time on the gateway network.
- Wait for the gateway to restart after a failed setup request, then try again.
OTA update fails
- Confirm the target address and gateway administrator password.
- Use the browser updater from a trusted LAN.
- Recover through native USB if the device no longer reaches Wi-Fi.
Related project
The same Steinel NightmatIQ Plus functionality is also available as an optional integration in the AR01V3 RF/IR, ESP-RC01 & Steinel NightmatIQ Plus Gateway. Choose that project when NightmatIQ should be added to an existing multifunction AR01V3 gateway; choose this repository for a small, dedicated ESP32-C3 installation.
License
Copyright (C) 2026 Bartosz Supcziński.
This project is licensed under the GNU General Public License version 3 only (GPL-3.0-only). See LICENSE.
Credits and support
- Author and maintainer: Bartosz Supcziński, bartek@env.pl.
- ESPHome project identifier:
envpl.steinel_nightmatiq_gateway.
When reporting a problem, include the firmware version, ESPHome version, reset reason and relevant logs. Remove passwords, keys, authorization headers, private backups and network identifiers before sharing diagnostics.
This is an independent community project and is not an official Steinel, ESPHome, or Home Assistant product.